Monday, December 29, 2008

Driver side floor pans

As soon as the torque boxes were welded I started fitting the floor pans. They are not difficult to be installed but need quite a many test fittings, then cutting and drilling the holes for spot welding. The new floor pans are longer than the original ones in the front end of the pans. This showed up to be excellent for me as I had not ordered new toe boards. The extension can be seen below.


Before the final assembly the edges of the floorpan were painted as it might be difficult to do later. First I welded spots to the area below inner rocker. Then I applied squeezers and pliers to pull the pan against frame rail extension and to the correct line in the propeller shaft tunnel where old and new metal overlap about one inch. It may appear later that rust feels that area nice and cozy but butt-welding would have been too difficult, at least for me.


I had to weld a couple of spots working under the body because I had drilled through the flange in the frame rail extension while removing the old metal. Therefore only few drilled holes can be seen in the above picture.


The separate rear part of the pan needs to be narrowed for about 6 cm as it is meant for coupes and fasbacks which do not have inner rockers. I was so busy working with it that I forgot to shoot pictures of it. Now I had fixed the first half of the floor. I wanted to do something else for a change.


Saturday, December 27, 2008

Torque boxes and inner rockers

The inner side of outer rocker panel was in good condition. It has been covered with zinc in the factory. I ground the small amount of rust and painted it as well as I painted the rest of the parts which would be covered when the new parts would be installed. The lower part of the rear torque box needed some patching but I decided to do it later after the inner rocker is installed.

Frame rails have been protected with paint.

The new parts looked great, but they did not fit exactly. The problem seemed to be that the inner rocker was about 1 cm wider than the original. Therefore it lined too high in the door jamb. I resolved the problem by bending the front torque box a little lower on the outer side. The inner side could then be hammered down to make it fit with the frame rail. Now the extra width was distributed evenly to the upper and lower area. I could be ground without having to weaken the spot welds.

Front torque box is installed and welded with spot welds
to inner rocker and seam-welded to the frame rail.
The side cowl panel and firewall still need some fixing.

As the inner rocker was in it's place I started welding it in the rear part of the car to attach it to the rear torque box. I had ordered new torque box covers but they are designed for coupes and fastbacks which do not have inner rockers. It almost ruined my christmas holiday once I realized that the part doesn't fit. After checking the I had correct parts I calmed down as I believed that there are no parts available for convertibles. So, they needed some modification to make them fit.

The modified rear torque box cover is being fitted

I spotwelded the cover to lower part of the torque box as well as to the inner rocker and rear frame rail. The leaf spring bracket was also welded to inner rocker. Now I could feel that the body (of the car ) was getting stronger again.

The lower right corner of torque box cover needs to be hand-made

I removed the rest of the of rusted parts to make room for fitting the new floor pans.

The floor has vanished. Not much left of the original

Floor pan under the rear seat was removed so that the new long floor pan can be fit.

Monday, December 15, 2008

Cleaning the driver side floor

Now the car was supported and back from the waterblasting. It was time to tear off the rest of the rusted-out parts. I decided to start on the driver's side. First I removed the rear floor pan which did not take long. It almost came out with bare hands. Then I drilled and grinded the seat platform. You can see the diffence between the waterblasted metal and the part of the floor which lyed under the seat platform.

I still left floorpans connected to front frame rails. I wanted them to remain as long as possible to give the body some support. The floorpan doesn't even touch the inner rocker any more. After removal of the seat platform the inner rocker is practically in two pieces. The front and rear are connected only by the outer rocker. The inner rocker was removed piece by piece.

The pieces of Boston railway track do not support the car if they are separated by the rusted out rocker under the seat platform. Eventually after working a couple of evenings the most of the parts are off. I took some measures of the body just in case to control if it will be bent. So far it seems that the supporting structure is solid enough.


The front torque box is off. The frame rail needs to be patched. In this picture below you can see that the design of my "subframe connector" is incomplete. The frame rail can not be replaced as the car is standing on it. In this case only patching it was enough, so this did not bother that much. The second disadvantage is that the new torquebox does not fit in it's place. I needed to cut off the front extension of the outer rocker to be able to test-fit the new torque box. Well, it was shot anyhow...


Note that the car is standing on only four jackstands. The subframe appeared to be so stiff, that only three would have been enough. I patched the front frame rail, removed the remains of the rust and primered the new torque boxes and inner rocker before fitting them in place.


Front torque box above and rear torque box cover below.The phase of drilling and cutting the left side floor is over. It took longer than I expected because I wanted to make sure I won't do any irreversible mistakes. I'm sure that when I get to do the same on the other side I'll do it much faster.


Not much left of the inner rocker under the seat platform area.

Tuesday, December 2, 2008

UFO in my garage

Due to snowy weather conditions the trip to waterblasting took two weeks. But finally you could see a shiny unidentified object flying in to my carage.


The additional support structure can be seen under the floor of the flying Mustang. The rust damages were revealed earlier. Now it was able to see all the earlier patches too.


 Driver side rear wheel well and rear frame rail after the wash. Note the patch by the Swede on the right and the beutiful design of my subframe connector.


The trunk floor drop-off is made of bondo.


This one is my favorite. The wheel flare is made of...

...NO ADMITTANCE sign ! Ford NOS-part no: C5ZZ-1234-XX
But the car was back home in my small garage in one piece. The sheet metal parts which I had ordered earlier from the local dealer were soon to arrive and at last the restoration was able to start without the risk that the fumes and smoke from burning bondo would fill the house.


 Three months had passed since I drove Mustang for the last time and the job was about to start.

Saturday, November 15, 2008

High Pressure Wash

After it had become obvious that the car needed some heavier restoration than just replacing the floor pans, I started comparing the different ways of cleaning the old paint, dirt, antirust compound, bondo and rust out of it.

I decided to take the car to be washed with high pressure water. It is a method where water is pumped with the pressure over 2000 bars. This kind of pressure removes everything but the metal, it even removes the rust. In order to prepare the Mustang to be hung in the grill (or a rotisserie) during the wash, I started designing a supporting structure for the car’s body.

As the doors were removed I installed support braces in their place.


Then I bought about 20 metres of 40x40mm square tube with thickness of 1,5 mm. I bolted four crosswise bars to the body. The first in place of the bolt holes for lower control arms, the second between the front frame rail extensions, the third between the front end of the rear frame rails and the fourth between the rear of the rear frame rails. Then I welded two longitudinal bars which connect them on both sides of the car. These longitudinal tube were left under the crosswise bars to leave space between them and the floor structure. Now I had a solid subframe connectors which would prevent the car from twisting during the blast and restoration. The structure is solid but has some disadvantages too, which I discovered later.

I then welded the grill supports for front and rear and bolted them to where the bumbers usually are bolted. I tried to line the tubes so that the front and rear tube would be in line which each other so the car would roll easily in the grill.


Now the car was prepared for the car-wash. It was lifted on a trailer with a help of a couple of friends.This picture below tells a lot about the truth lying under the nice paint. The inner rocker viewed from the driver side wheel well.


I just hope that there is something left of my car after the high pressure wash...

Sunday, August 31, 2008

The summer is soon over

After the minor spring service I drove the Mustang as often as possible during the summer. My intention was to use it as a daily driver and that’s what I did. Whenever the weather was sunny or at least not rainy I chose to drive it instead of my family wagon. Convertible appeared to raise interest among the other travellers and pedestrians. If not on every other traffic light but at the latest on the third someone would comment what a nice car I have. I started counting traffic lights while driving. It also showed up to be very practical to go shopping with top down. The bags are easy to load on the rear seat without having to use keys or open doors.


I mostly drove short distances near home, but made one longer trip with my wife to spend a weekend in a city located about 160 km from us. On the bending country roads the car was at it’s best, driven with speed of 45-50 mph ( 60 mph is the absolute maximum for top-down driving and to avoid “waving” of the unibody) . During this trip I met the only technical problem when the retaining spring in the right-hand drum brake broke down. During the four months of summer Mustang gathered 2200 miles in her odometer (which by the way is as much as the average for the previous 43 summers) It’s fuel economy was good. Gasoline consumption was moderate, only 11,5 litres per 100 kilometres.
But soon it was August 31st and I had to decide whether to have the car inspected or to start the restoration. After reviewing the floor pans I decided to unscrew the plates…
I had thought that replacing the floor pans could be done without having to tear the whole car down. But I soon discovered that floor pans were not the only parts to be repaired. The parts of the unibody structure like inner rockers were shot or at least “creatively” repaired. You can not replace inner rockers without touching the torque boxes. If you fix the torque boxes, you’ll most probably need to fix frame rails as well. If you remove all of these parts at one time you’ll get two convertibles, the front and the rear. Therefore there must be supporting structure installed before removing the rotten parts. Anyhow a lot of cutting, welding and grinding was to be done before the floor pans would be replaced.

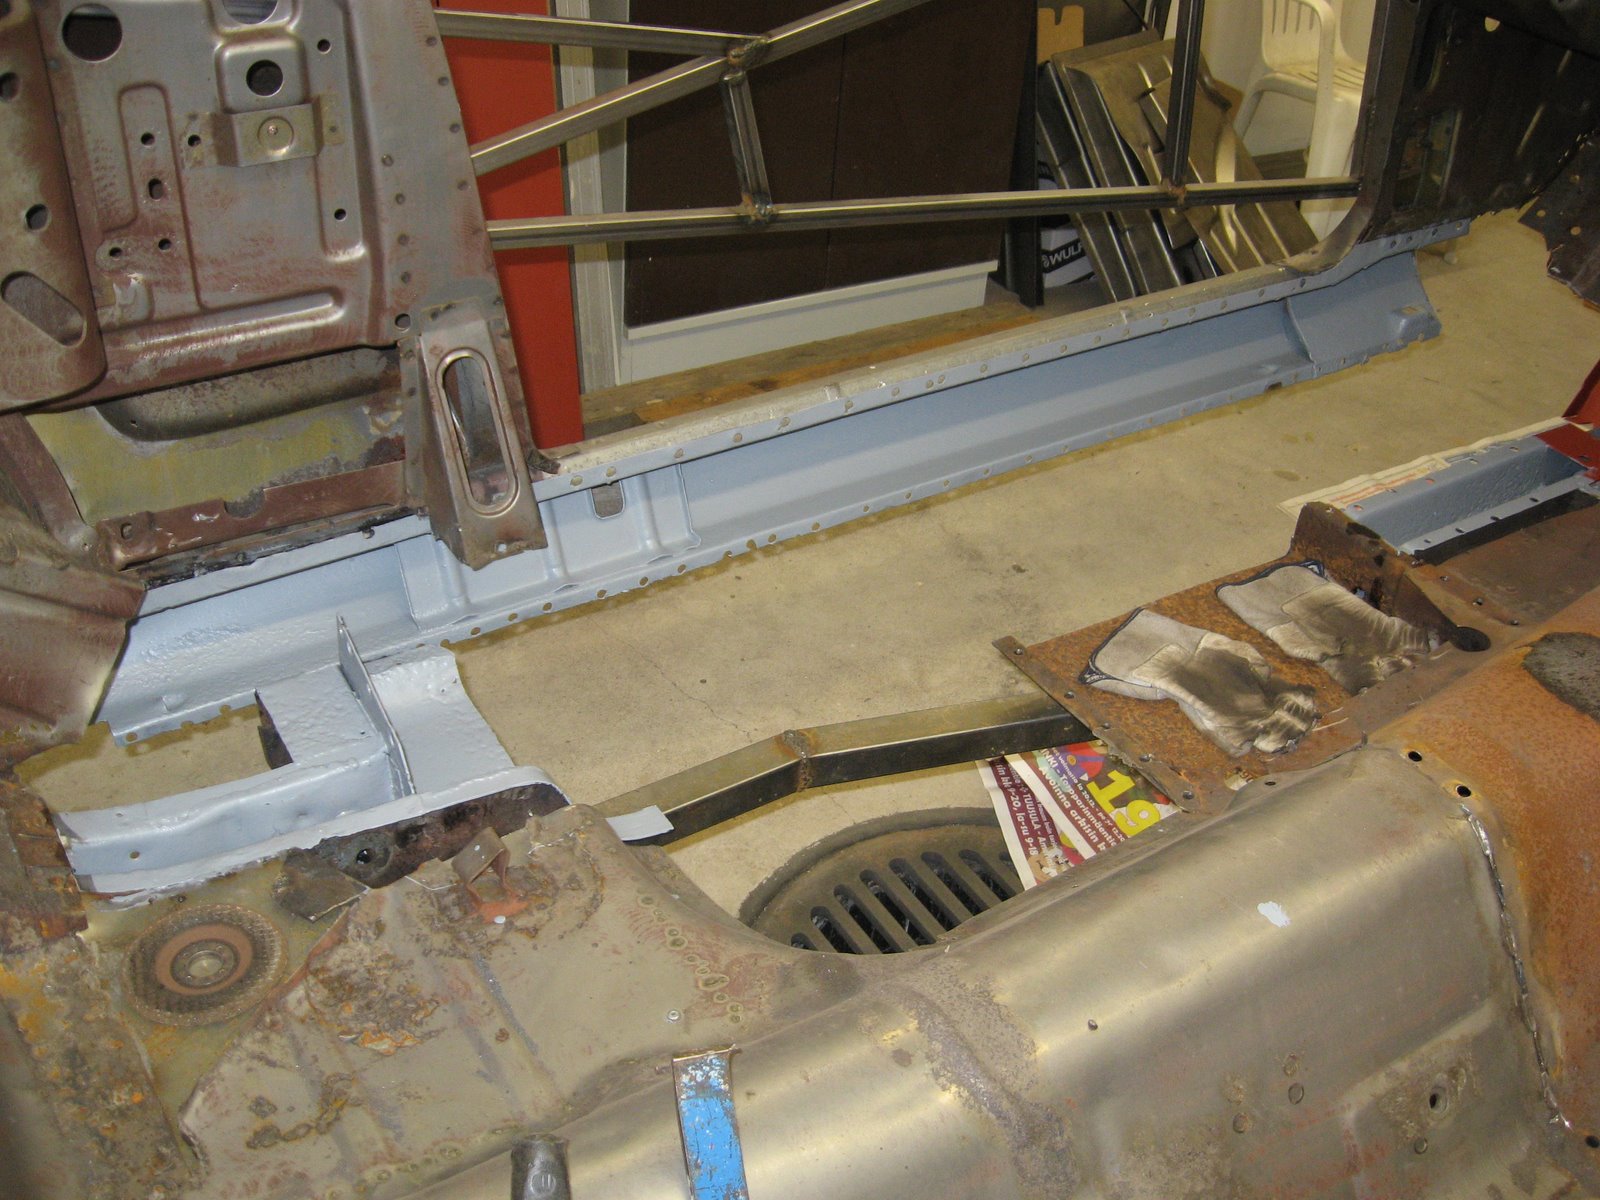
I googled the internet and found a couple of blogs with helpful information (thanks Kev and Alex). Their pictures and stories encouraged me to do this by myself. I dismounted the interior in order to clearly see what was lying under the carpet. And this is what I found.


The rusted out floor has been patched with light alloy plates riveted to the remainders of the floor.


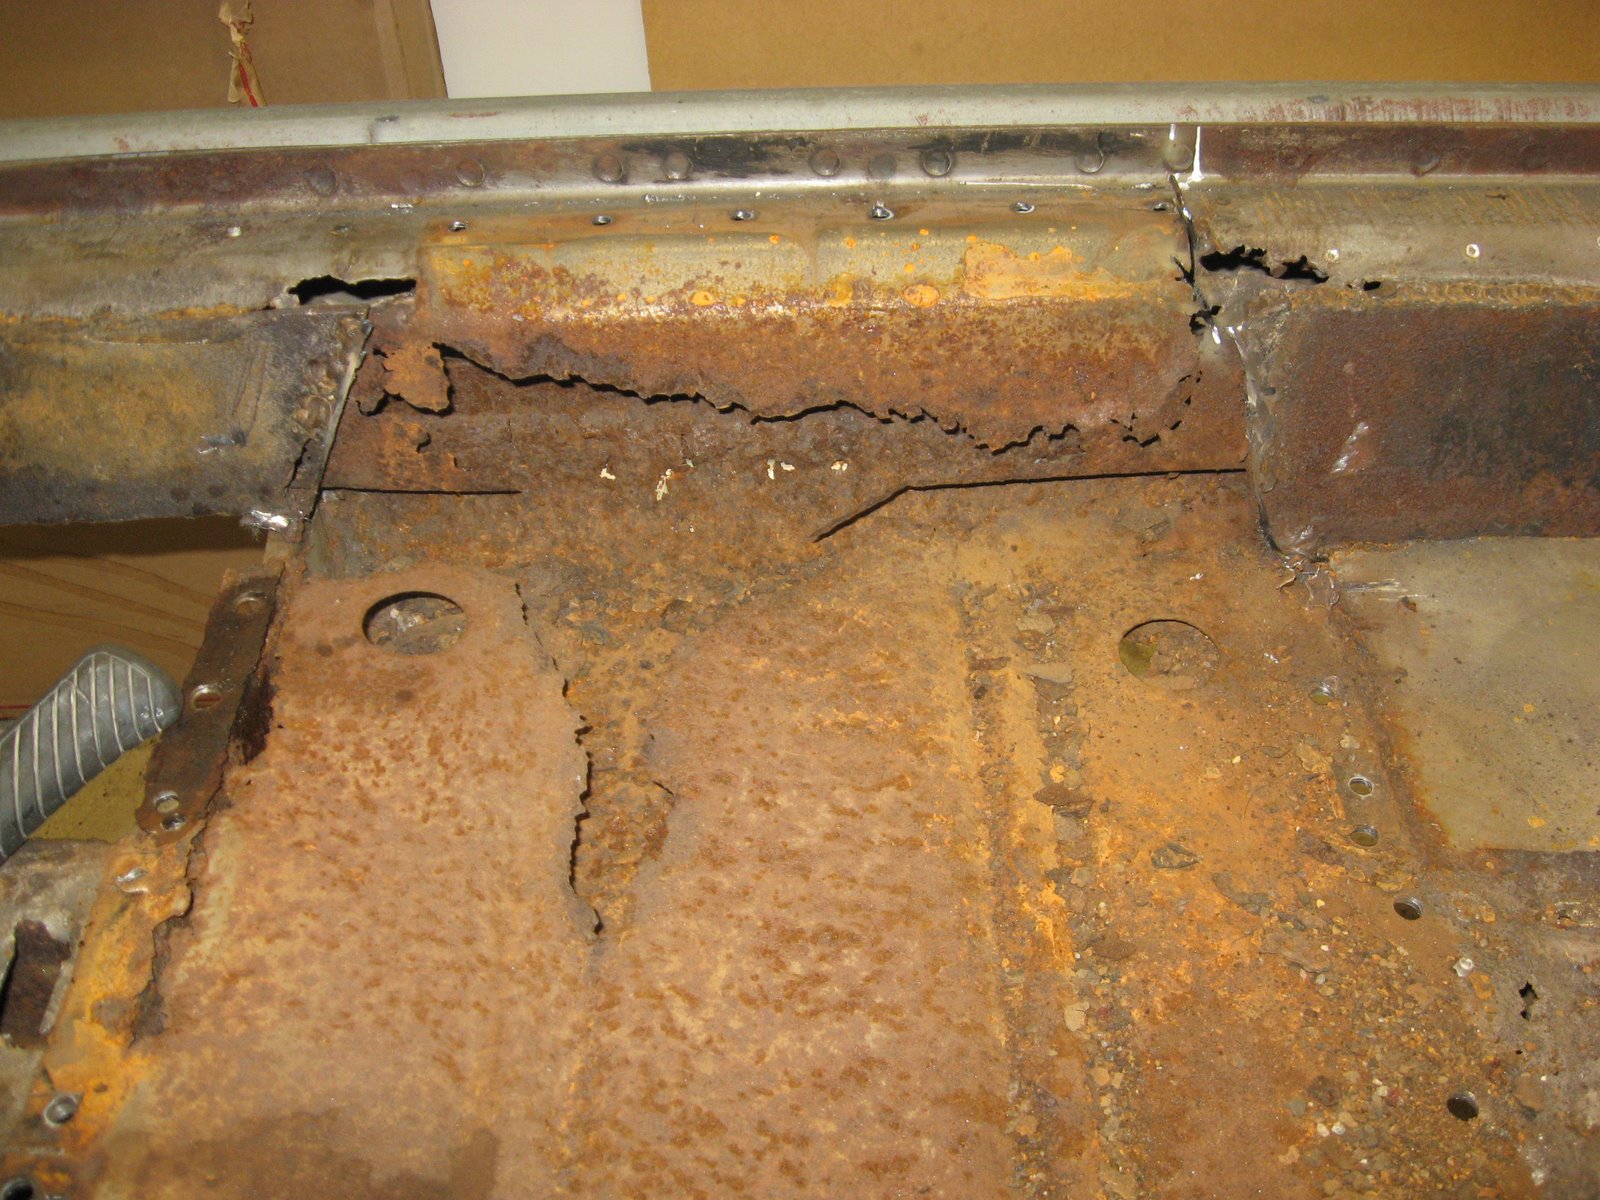
 Under the plates you can see that the original rear foot well is partly vanished, the rear torque box is rotten through. The shiny plate has been spot-welded from here and there by the swede, I guess. The floor pan under the rear seat is so rusted that parking brake cable is visible.


The driver side rear torque box. Note the thick metal which has been used to patch the inner rocker in lower right corner of the picture. If there is a missing piece of railway track somewhere in Massachusetts, don't blame it on me. Someone else welded it in my car. The thickness of the metal in next to nothing if it is welded to a rusted out part.

It was time to disassemble the rest of the car...


Wednesday, January 2, 2008

First Inspection

The first inspection was done when the car was home. It seemed to run fine. I was astonished of the nice silent sound it had, espesially with the top down. The VIN code was easily decoded:

Year: 5 1965
Plant: F Dearborn, MI
Body Series: 08 Convertible
Engine: T 200 1v I6

Body: 76A Convertible, Standard Interior
Color: R Ivy Green Metallic
Trim: 28 Lt. Ivy Gold Crinkle Vinyl, Standard Interior
Date: 23A January 23, 1965
D.S.O: 11 Boston
Axle: 2 2.83:1, Conventional
Trans: 6 C4 Automatic

To my knowledge, the only options chosen by the first owner were the C4 automatic transmission and the AM radio. In the windshield I found a sticker of the inspection done in Massachusetts for year 2007. Had the pony lived there all these years ? It had around 92.000 miles in the odometer. If this was all, it would mean an average mileage of only 2.000 per year. That's not a lot. I am not sure what kind of climate there is in MA, but it is not California anyhow. Maybe there are only a couple of sunny summerdays yearly. Or had the car stayed in the backyard for years since the owner passed away in the 80's ? Then someone bought it, fixed it, painted it red and sold it to the swede. I started wondering the story behind this car. Was this car bought as a present to a high school graduate girl in '65 or to an elderly lady. Somehow I couldn't figure a ferocious youngster driving an ivy green six-cylinder.

I replaced the sealed beam headlights with H4 type to meet the local legislation, had the car registered and fixed some minor things for the coming season. I made a couple of interesting discoveries. Under the rear seat I found patches made of twisted plate, pop-rivets, bondo and a top of a tin can (of asparagus, I assume. Someone did not like it and hid the can under the seat).


The other discovery was rather nice one. Obviously the other (the AM radio) of the two options had broken down in '99 and the owner had visited Antique Radio Service in Bedford, MA and bought a repaired one. This and the name and address of the customer ( I'll call him Tom ) could be read in the shop receipt which I found behind the glove box. Antique radio shop had antique type of receipt form which helped me to track the previous owner.

With the help of Bedford Town website I was able to find out that Tom still lived there and with the help of Google Earth I could even take a look at the street where Mustang used to live. I wrote Tom a letter asking him to tell his story about the Mustang. Tom replied by email a few weeks later. He had purchased the car in April of '96. He promised to come back with more info later, but unfortunately he hasn't. Was he the man that hid the asparagus ? So, Tom , if you're out there , please mail me.