Monday, December 28, 2009

The hood alignment

Now the engine is installed as well as Holley 1940 1V-carburetor which to my knowledge is not the one which was installed in the factory back in 1965. Instead it is a replacement type of carburetor that Ford apparently ordered from Holley as the original Autolite 1100 showed up to be more or less unfaithful.

The driver side front fender, door and quarter panel had some lead melted over the seams. Because the fender was there and I needed some more room to my carage as well as somenthing to cover the engine, I decided to install the hood. First thing to do is to bolt the hinges into the fenders. No need to torque them too tight at this point...

...because you have to unscrew them many, many times before the hood lines up nicely. I studied the internet for good advice for aligning these parts but it seems that trial and error is the only available instruction for this job. My hint is: if the rear end of the hood is too high, release the screws and lift the hinges up from the front end. This allows the rear end of hinge to go lower.


Ok. Destiny can be recognized as a Mustang now but what surprises me is the ride height which still is too high. There is not much weight to come to the front anymore. Someone said that sandblasting the springs is about the same as forging them. Might be true. Anyway, after a short mechanical period, I'll have to get back to my grinding equipment and sanding paper before the final primer shooting.

Sunday, December 6, 2009

Engine installation

A short repetition of the history (all Finns may skip to the first pic) :
Finland was a territory of Sweden until 1809 when the Russia conquered the eastern part of Sweden after two years of battles. Finland remained part of Russia until V.I.Lenin signed the declaration of independence on December 6th 1917. A couple of years later Mr.Molotov of Russia and Mr.Ribbentrop of Germany argeed upon a split over the territories of Europe. According to that pact, Finland was to be a part of Soviet Union's premises. On the 30th of November 1939 Soviet attacked Finland without any declaration of war which was followed by a war known as the Winter War of Finland, a 105 day battle after which Finland remained independent but lost 10% of it's geografical area. A year later Finland joined Hitler's troops in order to get Karelia back (with interests) by attending the Continuation War  but that's another story.

And what has all this to do with the restoration of a Mustang ? Nothing. But a small quiz to summarize your knowledge of the WW2. Which three european capital cities of countries participating the WW2 remained un-occupied. The correct answer is in the bottom of this entry.

Now, here is the inline-six with C4 automatic transmission hanging from a hook in the roof of my garage.


The packet is hoisted up and the unibody is rolled under the package. Mr. 67FB is controlling.


Easy as can be. After three quarters of an hour the powermill is back where it belongs. Damn, the shifter linkage points to a faulty direction.


Mr.Camaro68 has checked the engine, cleaned it and painted black and red. Many of the gaskets were replaced. The cylinder head was not opened as there was no reason for that. Here is a shot of the timing chain which had streched to en extent that it had to be replaced along with the new crank and cam gears. Some slack down there. I am waiting to see whether there will be a smoother run and improved fuel economy.


 Here it is sitting back in the engine room. It originally had 120 hp.The fuel filter bowl will be replaced later.


This shot was taken a year ago while the engine was moving upwards.


A couple of pictures to compare the before and after status of the engine. The cylinder head is supposed to be black. Only the valve cover and and air filter cover are to be red-orange.


Yes. The fuel pump bowl will be replaced with a new one which is still under construction.


Destiny looks like a car again , doesn't she ? Below is a another shot of her from a year ago. The change is evident. With the engine installed I have got a plenty of options how to proceed with my project.


And the correct answer for the question above is that the three un-occupied capitals were Moscow, London and Helsinki. A reason to celebrate the independence day.

Wednesday, December 2, 2009

Destiny is taking a night out

Some Dinitrol 410 to the seams after hand-sanding and one more liter of  Spies Hecker Permacron® 630 and the floor is done. This took about three nights altogether.


Rear axle and the differential case was coated with the same stuff. I did not open the differential. Some oil leaked out from the ventilation tube while turning it around but it looked clean so Why fix it if it is not broken.


I had some paint left and there is no snow outside so I had the chance to handle my pair of skies as well.


A set of new exhaust pipeline and a muffler would cost about $230 or about 300€. Even after spending a year outside my garage under the gutters it only had some surface rust which was disappeared after two hours of sanding. A rattle-can of heat-resistant paint (cost 6.60 €) sprayed and heated over the tube. The exhaust has been welded into one piece so it has to be installed at this point, before the rear axle.


As soon as that was done, the leaf springs were installed with new front end bushings and eye-bolts. The rear axle was placed on jack stands by lifting it one end at a time until it was in such height that the springs could be attached to rear shackles.


And the axle was dropped on the leaf springs and bolted in place. Destiny is ready to roll again.


Destiny hasn't been outside of the garage since last January. At that time she was carried but this time I did not need much help turning her on my driveway. A short stop on the threshold was needed to blow the dust off.

Exactly a year ago this rust-bitten car flew back from waterblasting. The rear tail light panel and the area behind rear valance is the only remaining rusty area.


The engine room is ready and waiting for the delivery of the straight six due to happen next weekend.


Monday, November 23, 2009

More primering and fitting

My friend finished with leading the seam welds on the passenger side, so I was able to epoxy primer the quarter panel. I spent an other evening sanding the door and front fender and primered them as well. The door was loose when primering, but I couldn't resist the temptation and hung it back the next day.


The outer rocker was primered too. It only needs a small patch to the rear end near the rear wheel well.


I test fitted the rear seat because I wanted to ensure the correct position for the brackets which hold the bench and I am going to weld screws to the floor where they'll lock the lower end brackets of the backrest. Fits fine. It only needs a couple of nice girls sitting there.


During the summer of 2008 Destiny's engine and transmission worked fine. The 200 cubic inch six-cylinder is known to be a durable engine if maintained regularly. There is no reason for a total overhaul and I had planned only a minor cleaning and painting for it. Anyhow I was glad and surprised when an other friend of mine offered that he would like to do this part of the project for me. I thought that he's only interested in V8-equipped GM-products with +400 hp. But his own restoration project is ready and he needs something to do to pass the polar night. Here is a glimpse to what's going on in his garage with my 200.


We have agreed on a schedule that Destiny's engine and transmission is delivered back and installed on Finland's independence day, on Sunday the 6th December. I've got two weeks to prepare Destiny for that.

Monday, November 16, 2009

Underside floor

I spent about nine nights lying on my back. My neck and shoulders are still aching but finally I think I've come through the worst of it. Not the swine flu but preparing the underside of the floor for painting. I wasted hours with angle grinder and every other scraping device I could imagine. I have used 0.8 mm string in my welder. Now I understand why someone adviced me that 0.6 mm would be enough. The reason is, the thicker the string, more to grind. I'll have to remember this prior to starting with my next project.


In the above picture is a view to transmission crossmember and propeller shaft tunnel. Some remainders of seam weld between the tunnel and floorpan can be seen. The flaps which connect the frame rails with reinforcement pans are not alike with each other. But WHO CARES as long as they are solid. Below is a shot to passenger rear wheel well and rear crossmember. This was the nasties area for grinding. My advice to anyone who is clearing this area: Have it media blasted !


The areas under the rear seat. Yes, I made them myself ! They may not be alike either but at least the rear seat passengers do not have to fear for dropping on the highway.


You may say that you've seen better. So have I. But...


... it is very rare to see something like this anymore. Yak !

Thursday, October 29, 2009

Passenger door revised

I messed up with the lower patch panel for the passenger side door. See the blog entry of this miserable moment. I ordered a new patch panel (Canadian made, excellent fit btw.) from NPD. Despite of my ugly welds, it took me one night to remove the potato field off the door and another one to fit and weld the new one and a third one to finish it.

Although mig-welding is almost as fun as chain sawing, I felt pretty frustrated redoing something while I still have enough work until the car is back in the traffic. But now the result has approved the quality control carried out by myself. Looks much better now, doesn't it.

The wide picture shows what has happened on the rear quarter panels. A friend came by and offered a helping hand with melting some lead over the sheet metal welds. Now he can proceed with right side door and front fender.


Meanwhile I think I'll concentrate on finishing the floor and installing the rear axle. Destiny still has to wait a week or two until she can burst out of the garage doorway.

Friday, October 23, 2009

Front suspension and steering linkage

The parts for front suspension had been media blasted and primered in spring. I painted them black along with the engine compartment. The lower control arms got updated with new bushings but the ball joints appeared to be in such a good condition that I approved them. As a matter of fact if they are worn, you need to replace the LCAs as a whole. If both your upper and lower control arms are in a bad shape you might consider a kit available from Cal Mustang for replacing all the control arms. But I did not want to invest to them at this time. These will do until I'll do the disc brake conversion as well.


First I attached the LCAs and the sway bar with new end links. I had ground the rivets off the original upper control arm ball joints. The new ball joints seem to have the grease fitting in a diffent place than what the originals did. Therefore the screws were installed sort of upside down. Maybe it does not matter anyhow. The camber and caster are adjusted with shims in '65s. I installed them back as they were when disassemled. The control arms are similar on both sides so there is a fifty-fifty chance that I've mixed them. I'll have to adjust the camber and caster later anyhow.

Next: I attached the strut rods. These are the old ones which have only been blasted and painted. Even the rubber bushings at the front end of the rods are original.

I could not figure the purpose of the "wings" between the strut rod and the LCA even though I studied the Mustang Illustrations Catalog. But I decided to install them back anyhow.

Later I discovered that the wings act as limiters for steering. If turn enough the spindle arm will meet the "wing" and prevent the wheel from turning too much.


Once the control arms were ready I placed the spindles in between. And not only the spindles but the RUSTY (???!!!???) front brake drums also. OK, I'll do something for the drums at the time when all the for drum brakes are checked. The back side of the drum brake plate was cleaned with wire brush and painted black.

I want this vehicle to roll so I won't spend time with rusty brakes for now.

The front coil spring got themselves new insulators for upper ends and a coat of enamel. Here is shown a best position for compression tools (borrowed from a friend, thanks). I decided that there must be six rounds of coil spring wire between the jaws. Take some time to position the jaws in a way that they will not be in way when you place the spring between UCA and the shock tower top end.
And here is the coil spring 4 inches shortened and ready to go in. Instead of ratchet you may find useful to use wrench tool for loosening the compressor tool because...

...you may end up with a situation where you can not detach your ratchet because there is no more space left. I know , I did and had to compress again.

But finally the spring was there.

My carage is small, only 6,0m x 3,5m. Therefore I need to move my car while proceeding with the project. This can be done with a help from a couple of friends and their wives or by rolling the car on its own wheels with a help from my own wife. That's why the steering box and linkage are the next thing to be installed. Not much time did I spend with restoring the steering box. You can not fix it art home. If it's worn replace it. The steering shaft is Spear O'matic -type, a solid rod which may be harmful for your chest in case of an accident.

And the opposite side companion for the steering box: the pitman arm.


Tie rods were worn to an extent that they were replaced with new ones. I'm so stingy that I revived the original tie rod sleeves and installed the tie rods prior to attaching them. I screwed an equal amount of threads at both ends so while adjusting the toe neither of the tie rods will drop out of threads. And a rule of thumb is that the tie rod with counter-clockwise threads is the outer one. The inner ones have normal, clockwise threads.

I couldn't resist the desire to see Destiny ( I call her My Destiny nowadays) on her front feet shamelessly posing with the new KYB Gas-a-Just shock absorbers. I would have preferred the softer and cheaper GR2-type of KYBs which might have been better for a daily cruiser but my local dealer bargained these for 100 € /pair VAT 18% included. ($150) . In US you can obtain ones from NPD for $43,95 /each.

A lot of negative camber seen in this picture below. This is the weakness in Mustang's front suspension. The camber variates depending on the ride hight which is not good for the grip. Too much negative in the up-position and too much positive in down-position. Those willing to improve their vehicle's handling and performance on curvy roads may want to do something for this disadvantage. But I don't ! At least not anymore. No reason for adjusting camber/caster/toe at this point. The front will move downwards once the 200/C4 is installed.
But where is my engine and tranny ? Only a licquid gas container can be seen under my workbench. And a jar of California Sun Maid Raisins on top of it. Is that all the thieves left ?

Monday, October 12, 2009

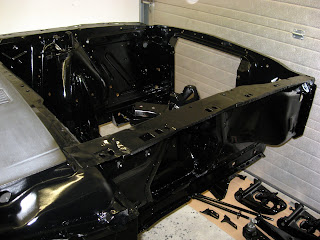
Engine compartment paint

Two weeks, I said in May. I'll let the primer dry for two weeks until I'll give it a final coat of semi-gloss black. After 21 weeks of drying I guess it's time to crawl back into the garage and start sanding and preparations for the paint job.

The engine compartment had a lot of drips and I had to use rough grit sandpaper for those areas. But mostly I managed with 250 grit.

The wheel well side turned out to be easier. Epoxy primer needs to be sanded to ensure good adhesion for the clearcoat. The color turns gray when the surface is ground. A friend of mine suggested polyurethane coating for the engine compartment. It forms a good shockproof surface and will not get scratched if it is hit by a wrench while fine-tuning his huge aluminium big-block engine. I discussed this issue with my candidate-for-body-paint-job. He absolutely refused the idea and voted for acrylic based paint. I do not want to argue with a specialist so acrylic shall it be. And due to the fact that my wrench is so small and my six-banger is so narrow, I felt OK with the decision.

The windshield window frames of a convertible will be covered with mouldings to such an extent that no body color will be seen. Only the inner side of the pillar will be visible. My interior will be black so I decided to do the frames and dashboard as well.

A lot of vacuuming was needed until I was able to apply silicone remover and Dinitrol 410 seam sealer and as soon as this was done I proceeded with spraying the Spies Hecker Permacron® 630 . This was done using wet-on-wet technique straight after I had finished with seam sealer so sorry, no pictures of that phase. Actually the sealer includes polyurathane but is compatible with the acrylic enamel. Here are a couple of pictures of the finished product after three coats of paint.

I ordered something between glossy and matt. The guy at the paint shop said he mixed 70% of the gloss-compound. The result may be too shiny but looks fine to me.

I had prepared the UCA's, LCA's and the strut rods and handled them as well.

The dash is now ready for the installation of the mono AM radio.

Looks quite menacing now, like UFO has turned out to Darth Vader's battleship.

To my opinion this paint job succeeded well. There can be seen a few scrathes from using the rough sanding paper but once the engine is back in they'll be difficult to be noticed.